TV Set Compatibility List
Complete TV reference for InnSpire installations: compatibility matrix, serial communication profiles,
model-to-config mapping, and brand-specific service guides. This ispage thelists single source of truth for TV hardware.
1. Compatibility Matrix
Whichall TV models worktested for compatibility with InnCableInnSpire (STBproducts.
control)Grouped andby InnSmartmanufacturer, (nativesorted smartby TVmodel. app).Last updated: 2026-04-05.
Legend:
✓ Yes = Compatible and tested ·|
✗ No = Not compatible ·|
Cable Type = physical connection method for InnCable STB-to-TV serialSTB control
Samsung (16 models)
InnCable:InnCable compatible: 16/16 compatible · InnSmart:InnSmart compatible: 8/16 compatible
| Model | InnCable | Cable Type | InnSmart | OS / Platform |
|---|---|---|---|---|
| G48AD690DW | ✓ Yes | RJ12 | ✗ No | Orsay |
| HG43AT690UK | ✓ Yes | RJ12 | ✓ Yes | TIZEN |
| HG43AU800EE | ✓ Yes | MiniJack - Both | ✓ Yes | TIZEN |
| HG43ND470SFXZA | ✓ Yes | RJ12 | ✗ No | — |
| HG48AE690DK | ✓ Yes | RJ12 | ✗ No | Orsay |
| HG49NE477S | ✓ Yes | RJ12 (Exist as alt. Ex-Link) | ✗ No | — |
| HG55AT690UK | ✓ Yes | RJ12 | ✓ Yes | TIZEN |
| HG55AU800AW | ✓ Yes | MiniJack - Both | ✓ Yes | TIZEN |
| HG55AU800AWXXM | ✓ Yes | MiniJack - Both | ✓ Yes | TIZEN |
| HG55AU800NF | ✓ Yes | MiniJack - Both | ✓ Yes | TIZEN |
| HG55BU800NF | ✓ Yes | MiniJack - Both | ✓ Yes | TIZEN |
| HG55CU700NFXZA | ✓ Yes | MiniJack - Both | ✗ No | Tizen 7 |
| HG55ND890UFXZA | ✓ Yes | MiniJack - RS-232C (RJ12) | ✗ No | — |
| HG55NE477S | ✓ Yes | RJ12 (Exist as alt. Ex-Link) | ✗ No | — |
| HG65AU800AWXXM | ✓ Yes | MiniJack - Both | ✓ Yes | TIZEN |
| HG65ND890UFXZA | ✓ Yes | MiniJack - RS-232C (RJ12) | ✗ No | — |
LG (39 models)
InnCable:InnCable compatible: 38/39 compatible · InnSmart:InnSmart compatible: 31/39 compatible
| Model | InnCable | Cable Type | InnSmart | OS / Platform |
|---|---|---|---|---|
| 32LN560HBUA | ✓ Yes | RJ12 (MPI, RS232) | ✓ Yes | WebOS 22 |
| 32LV761H | ✓ Yes | Minijack - RS-232C (D-Sub 9 Pin) | ✓ Yes | WebOS 3.5 |
| 43LV761H | ✓ Yes | Minijack - RS-232C (D-Sub 9 Pin) | ✓ Yes | WebOS 3.5 |
| 43UM660H | ✓ Yes | Minijack - RS-232C (D-Sub 9 Pin) | ✓ Yes | WebOS 5.0 |
| 43UM670H0A | ✓ Yes | RJ12 (MPI, RS232) | ✓ Yes | WebOS2.3 |
| 43US660H | ✓ Yes | Minijack - RS-232C (D-Sub 9 Pin) | ✓ Yes | WebOS 5.0 |
| 43US660H0GD | ✓ Yes | Minijack - RS-232C (D-Sub 9 Pin) | ✓ Yes | WebOS 5.0 |
| 43US670H9UA | ✓ Yes | RS-232C - D-Sub 9 pin, MPI - RJ12 | ✓ Yes | WebOS 5.0 |
| 43UT570H | ✓ Yes | RJ12 (MPI, RS232) | ✗ No | — |
| 49LV761H | ✓ Yes | Minijack - RS-232C (D-Sub 9 Pin) | ✓ Yes | WebOS 3.5 |
| 49US761H | ✓ Yes | Minijack - RS-232C (D-Sub 9 Pin) | ✓ Yes | WebOS 5.0 |
| 49UT570H | ✓ Yes | RJ12 (MPI, RS232) | ✗ No | — |
| 50UM660H | ✓ Yes | Minijack - RS-232C (D-Sub 9 Pin) | ✓ Yes | WebOS 5.0 |
| 50UM670H0A | ✓ Yes | RJ12 (MPI, RS232) | ✓ Yes | WebOS2.3 |
| 50UQ80006LD | ✗ No | — | ✗ No | WebOS |
| 50UR770H9UA | ✓ Yes | RS-232C - D-Sub 9 pin, MPI - RJ12 | ✓ Yes | WebOS 5.0 |
| 50UR777H | ✓ Yes | RJ12 (MPI, RS232) | ✓ Yes | WebOS 6.0 |
| 50US660H | ✓ Yes | Minijack - RS-232C (D-Sub 9 Pin) | ✓ Yes | WebOS 5.0 |
| 55LV761H | ✓ Yes | Minijack - RS-232C (D-Sub 9 Pin) | ✓ Yes | WebOS 3.5 |
| 55LX774H-VA | ✓ Yes | MiniJack - RJ12 MPI | ✗ No | — |
| 55UM670H0A | ✓ Yes | RJ12 (MPI, RS232) | ✓ Yes | WebOS2.3 |
| 55UM777H | ✓ Yes | RJ12 (MPI, RS232) | ✓ Yes | WebOS2.3 |
| 55UN570H0UA | ✓ Yes | RJ12 (MPI, RS232) | ✗ No | — |
| 55UR760H9UA | ✓ Yes | RJ12 (MPI, RS232) | ✓ Yes | WebOS 5.0 |
| 55UR762H | ✓ Yes | RJ12 (MPI, RS232) | ✓ Yes | WebOS 5.0 |
| 55UR770H | ✓ Yes | RJ12 (MPI, RS232) | ✓ Yes | WebOS 5.0 |
| 55UR770H9UA | ✓ Yes | RS-232C - D-Sub 9 pin, MPI - RJ12 | ✓ Yes | WebOS 5.0 |
| 55UR777H | ✓ Yes | RJ12 (MPI, RS232) | ✓ Yes | WebOS 6.0 |
| 55US660H | ✓ Yes | Minijack - RS-232C (D-Sub 9 Pin) | ✓ Yes | WebOS 5.0 |
| 55US761H | ✓ Yes | Minijack - RS-232C (D-Sub 9 Pin) | ✓ Yes | WebOS 5.0 |
| 55UT570H | ✓ Yes | RJ12 (MPI, RS232) | ✗ No | — |
| 65LX774H-VA | ✓ Yes | MiniJack - RJ12 MPI | ✗ No | — |
| 65UM670H0A | ✓ Yes | RJ12 (MPI, RS232) | ✓ Yes | WebOS2.3 |
| 65UM777H | ✓ Yes | RJ12 (MPI, RS232) | ✓ Yes | WebOS2.3 |
| 65UR770H9UD | ✓ Yes | RS-232C - D-Sub 9 pin, MPI - RJ12 | ✓ Yes | WebOS 5.0 |
| 65UR777H | ✓ Yes | RJ12 (MPI, RS232) | ✓ Yes | WebOS 6.0 |
| 65US761H | ✓ Yes | Minijack - RS-232C (D-Sub 9 Pin) | ✓ Yes | WebOS 5.0 |
| 65UT570H | ✓ Yes | RJ12 (MPI, RS232) | ✗ No | — |
| 65UT770H0UB | ✓ Yes | RJ12 (MPI, RS232) | ✓ Yes | WebOS 4.5 |
2. Serial Communication Profiles
Each profile defines the port, baud rate, and command set an STB uses to control a TV (power, volume, input switching).
Profiles are assigned to TV models — see the mapping table below.
Protocols: RS232 (±12V), TTL (0-5V), Samsung SIA, LG MPI, Philips SICP, Samsung ExLink.
Connection via 3.5mm jack or RJ12 port.
| ||
| ||
| ||
| ||
| ||
| ||
| ||
| ||
| ||
| ||
| ||
| ||
| ||
| ||
| ||
| ||
| ||
| ||
|
3. Model → Config Mapping
Which serial config profile to use for each TV model. Grouped by brand/region.
LG (Europe) (31 models)
LG (US models) (34 models)
Philips (19 models)
Samsung (62 models)
Sharp (1 models)
4. Brand Service Guides
Samsung
There are many codes available for accessing service menu in various Samsung TV models. You can try following codes one by one until you get access to service menu:
With the TV off (on standby) using the remote control press - INFO - MENU - MUTE - POWER ON (standby button) TV will turn on & give various options - be careful what you change - you can brick the TV
With the TV switched on press MUTE - 1 - 1 - 9 - ENTER this takes you direct to hotel mode and the various settings like power on volume, max volume etc.
Power off your TV using the remote, then press following buttons quickly on the remote:
Mute + 1 + 8 + 2 + PowerDisplay/Info + Menu + Mute + PowerDisplay/Info + P.STD + Mute + PowerP.STD + Help + Sleep + PowerP.STD + Menu + Sleep + PowerSleep + P.STD + Mute + Power
You can press Channel Up/Down buttons to navigate between available options. To change their values, press Volume Up/Down buttons.
For Quick Cloning:
Insert the USB stick with the clone file into the USB port on the TV. Once it is in, simply hold ENTER or OK for 5-10 seconds. A prompt will appear on screen that will ask if you wish to clone to the TV. Hit yes and the TV will reboot with the clone settings saved.
RS232 vs TTL
RS232 uses -12V and 12V to represent digital 0 and 1TTL uses 0V and 5V to represent digital 0 and 1
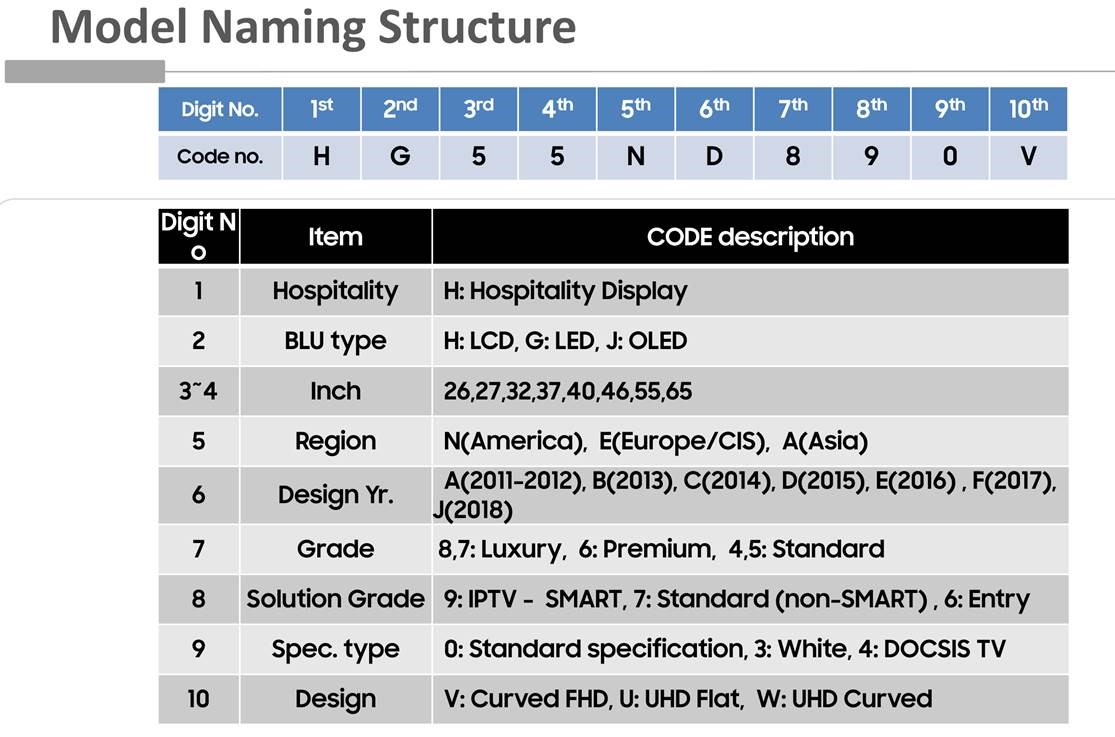
See Naming Structure on linked image.
Smart (= 9) H.Browser.
2011-2016 (= A-E) is Orsay Operating system
2017-2019 (=F, J) is Tizen Operating system
Attachments
📊 Samsung RJ12 cable.pptx (Presentation)
📎 Samsung Generic Hotel TV Interface Protocol_V1.33.pdf (PDF)
LG (US models)
Factory reset code
Keep on pressing menu until not responding then type 9876 OK (code for entering installer menu can also be 4321, 1478 or 3698 instead of 9876)select item 117, enter 413 ok, enter password 0413.
Different passwords:
7777 or 0413 or 8741 or 8743 or 8878 1105.
Accessing the Installer Menu (new TVs taken out of the box)
Unplug the HDMI and MPI cable on the SBB.Using the LG Remote turn ON the TV. If the EZ-Manager Wizard appears on the screen when you turn ON the TV, exit the wizard.Using an Installer Remote, press MENU SETTINGS repeatedly until the on-screen display of the of the TV setup menus no longer toggles, and then press the sequence 9-8-7-6 + OK to access the Installer Menu.Use the Up/Down arrow keys on the LG Remote to sequence through the available menu item.Set the Installer Seq Items as follows:
Item004 STRT CHANNEL 000Item007 STRT VOLUMNE 005Item035 HDMI1 ENABLE 001Item046 STRT AUX SRCE 003(HDMI1)Item118 POWER SAVINGS 001(If available)Item119 DATA CHANNEL 000
Press OK twice to exit the Installer Menu.Connect the SBB.
FTG configuration
Download the FTG DEVICE CONFIGURATION APPLICATION from here: http://www.lg.com/us/commercial/display-solutions/ftg(you can also download a software to create clone file, but the program crashes on my PC, try on your PC: FTG FILE MANAGER
In order to use the FTG Device Configuration application you will need a USB to TTL cable with a 2.5mm connector that goes into TV Link CFG on the back of the TV. (I have one only, but I guess DirecTV should have left these onsite if this is how they program the TVs?This software allows you to write a channel plan to the TV via the serial cable, but you should also be able to use FTG FILE MANAGER to create a clone file with the channels (you can set the channels in this application also), and then clone the TV as normal.
Anyway, the trick is to set logical channel 1 to RF Channel 133, as this is HDMI1 input.So, then we can use the remote in IR mode for Volume +/-, Channel +/-, Mute, Power, TV (number 2 from LG remote), Hotel (number 1 from LG remote)
As Direct TV already had created the channel plan, just ask them to add RF channel 133 as channel 1. Then we have HDMI1 on channel 1.We need have the TV widget say “Press Ch+ to watch TV, or Press TV to watch TV” etc, and the same on a full screen image if they any way select the TV widget.(the reason for all this, is that the LG TV does not allow us to control it using serial port, when it is decoding Proidium channels)
We also need to set the TV to start on HDMI1 input,
To enter hotel setting menu, press menu, menu, menu until not responding then 9876 ok, (to factory reset select item 117, enter 413 ok, enter password 0413).Set HDMI1 to start source by changing item #4 to 0 (Aux) and item #46 set to 3 (HDMI 1).
I think you will need some time to get this right, so plan some time for it. I am available to help.
Cloning from USB
On the Target TV, if necessary exit the Express Script InstallerMenu Wizard, and then use the Installer Remote to enter the TargetTV Installer Menu: Press MENU repeatedly until the on-screendisplay of the TV setup menus no longer toggles, and then press9-8-7-6 + OK (Enter).Set Installer Menu item 117 FACT DEFAULT to 001, and pressOK (Enter). When the value changes back to 0, press OK (Enter)again to exit the Installer Menu.Tune/set the TV to an analog or digital channel or Aux input (ideallythe same source tuned for 2-5-5 + MENU Mode during the CustomMaster TV Setup procedure, if applicable).Plug the USB memory device with the .tll file into the Target TVUSB IN port.Press MENU on the Installer Remote to display the TV setupmenus, use the arrow navigation keys to select/highlight the Optionmenu icon, and then press the number "7" key a total of seven timesto display the USB Download Menu.Use the Up/Down arrow keys to select Teach To TV, and thenpress OK (Enter).Use the Up/Down arrow keys to select the Master TV Setup youwant to install, and then press OK (Enter). Note: Filenamesidentify the TV and the TLL version (see example at right).Teaching status will be shown on the progress bar. When theTeaching process is complete, the USB Download menu will reap-pear on screen.When Teaching is done, remove the USB memory device from theTarget TV, turn OFF the TV, and unplug the TV power cord for 15seconds.Reconnect the TV power cord, and turn ON the TV. The MasterTV Setup should be resident on the Target TV
Fetching LG TV logs, see attached document 206-4288_Viewing CPU and PTC Logs (webOS TV Models)_Rev E.pdf
Attachments
📎 206-4288_Viewing CPU and PTC Logs (webOS TV Models)_Rev E.pdf (PDF)
📎 Customer_LG_Installation_Guide (1).pdf (PDF)
LG (Europe)
All European models RS232 and MPI
WARNING!!! When you are configuring older LG TV set with RS232 communication please remember to enable "LG IR Operation" function. If that function is not enabled the RS232 control for the Voume+/- and Mute_ON will not work. All other functions are ok except these 3.
Philips
Using the remote enter the following key sequence:
3 + 1 + 9 + 7 + 5 + 3 + Mute0 + 6 + 2 + 5 + 9 + 6 + Menu/Info/Status0 + 6 + 2 + 5 + 9 + 7 + Menu/Info/Status0 + 6 + 1 + 5 + 9 + 6 + Menu0 + 6 + 1 + 5 + 9 + 7 + Menu1 + 6 + 2 + 5 + 9 + 6 + Menu/Status1 + 2 + 3 + 6 + 5 + 4
Sharp
While the LCD is on, unplug the power cable.Then while pressing the {INPUT} & {VOL -} buttons on the remote, plug the power cable back into the outlet.When it powers up you will see a little "k" appear in brackets.Then on the TV, press and hold {VOL -} & {CH -} down and release.
http://factory-reset.com/wiki/Sharp_Service_Menu
RCA
This TV sets are using for DATA communications RS232 protocol. Compatible with our
ExLink cables.
It is not necessary to enable any mode on these TV sets to make them working with our InnCable. Only proper SL and Poer/Command configs.
Some configuration steps:
Typically, with an external HDMI driven solution, the only item we typically suggested to enable is the default input on power up. Also, if you’re concerned HDMI-CEC will interfere with control, you can disable this.
Set initial power on source:
Now, when the TV is powered OFF/On, it will return to the selected HDMI input regardless of where the TV was left off.
Disable HDMI CEC:
Obviously, since your product will be controlling the TV via RS232, you can just send commands to correct any undesired actions. Our status message repeats every second and provides the current state. (E.g. What channel is tuned/input is selected, current volume & volume status, whether you’ve initiated a LINK to deactivate the TV processor from processing any commands at all, etc…)
Attachments

📎 RS232 Protocol V1.17.pdf (PDF)
5. Maintenance Notes
- Adding a new
TV model
Compatibility Matrixmodel:—Add a row to thecorrectappropriate manufacturersectionsection.withInclude all 4 fields (InnCable compat, cable type, InnSmart compat, OS).SerialCableConfigtypes:—RJ12If(standard),theMiniJackTV needs a new serial profile, add it(3.5mm totheRS-232CSerialorCommunicationBoth),ProfilesD-Subtable9firstPin (RS-232C direct)ModelOSMappingvalues:—TIZENAdd(Samsung),theWebOSmodelX.X→(LG),configOrsaymapping(legacyin the correct brand/region sectionSamsung)Test in hotel environmentTesting:—Mark as✓ YesYES only after confirmed workingon-site,in a hotel environment, not justlablab.